Sunday, December 15, 2013
Use ES File Explorer to Unlock Hidden Android Apps (#12daysoftips)
If you have an Android device that you didn't purchase from Google directly (and even so, this trick may apply to you), then the company that made your device (and usually the Android OS as well) has probably hidden some (or most) of the stock Android apps that should be packaged, and replaced them with their own apps (or they just don't replace them at all). It is possible to find these apps, however, thanks to a nifty tool named ES File Explorer. You can download it here for Google Play devices, or here for those of you with Kindle Fires.

Monday, November 11, 2013
How to install and configure Glype
Glype is a script used to make a web-based proxy. It can be used to view the web anonymously and bypass web filters. It is one of the easiest to use and configure. It is free for personal use. It can be easily configured for multiple different features.
Requirments
Requirments
- A usable accessible web-server with these requirements:
- PHP5
- cURL
Installing
- Download Glype at https://www.glype.com/
- Extract the .zip and upload it to a web-server. We recommend FTP for uploading.
Configuring
- Access the directory that Glype was uploaded to on your web-server
- Make an adminstrator account. Most of the default settings are good for regular purposes. Read through to be sure that the settings set are right for you. One of the configurations that is worth looking at is the log feature, so your proxy data will be logged.
- That's it, its installed!
Wednesday, October 16, 2013
Pros and Cons of Google Chrome
| via Wikimedia Commons |
Google Chrome is a very powerful browser with some great features. However, it does have some downsides as well. Here are some of these pros and cons.
Pro #1: Chrome is open-source.
Or at least, its counterpart named Chromium, which lacks the full features of regular Chrome. Chromium is usually chock-full of new features, and is usually unstable. Because Chromium is open-source, developers can modify its source code, add or remove features, and publish it as a different package.
Pro #2: Chrome is extensible.
Chrome (and almost every build of Chromium) can access Google's site devoted specifically to extensions, themes, and apps, known as the Chrome Web Store. There are many extensions in the Web Store that can let you browse Wikipedia, store tab/window sessions in the cloud, or even check your Google+ notifications.
Pro #3: Chrome syncs settings across browsers.
It doesn't matter what operating system or even what computer you're using Chrome from: if you can sign into Chrome (with a Google Account), you can elect to allow Chrome synchronize your apps, extensions, browsing history, settings, and even open tabs to the cloud. This way, when you sign in, you get everything you opted to sync imported into your browsing session.
Con #1: Chrome stores passwords in plain text.
When you choose to have Chrome remember a password for a certain website, Chrome remembers the password, but keeps it stored in plain text. This means that anybody who can access your Chrome Settings can easily read your passwords, through Settings -> Show advanced settings... -> Manage saved passwords.
Con #2: Chrome user profiles aren't password-protected.
Before you create a second user in Chrome, think again. You can't password-protect user profiles (yet, as of the time of writing), so if anybody can get into Chrome, they can open your user profile. This is insecure, so a better method would be to have a separate installation of Google Chrome in each user account on your local machine.
Con #3: Chrome doesn't have native support for playing .mp4 files.
Chrome cannot play Windows Media Player audio/video formats without the help of a third-party extension (Windows 7 only). This extension does not come from the Chrome Web Store, so installation is harder. Follow the steps here to download and install the plugin.
Wednesday, September 18, 2013
About Embedded Google+ Posts
Recently, there has been a update in Google+ that allows you to embed posts into web pages. To embed a post (for most websites/blogging platforms):
1) In Google+, hover over the post you want to embed, click the down arrow in the upper right corner of said post, and click "Embed post".
2) You will get HTML/JavaScript code, like the code in example A. Copy it, and paste it where you would like the embedded post to appear.
Example A
For WordPress.com blogs only (the version of WordPress that you don't host on your own server):
1) Find the post you want to embed in Google+ and click the arrow, but instead of clicking "Embed post", choose "Link to post".
2) Copy the URL that you get, and either paste the Google+ URL on its own line like in example 1, or use the official WordPress shortcode in example 2.
Example 1
Example 2 (replace the existing URL with the URL of a valid Google+ post, and use square brackets instead of curly braces)
1) In Google+, hover over the post you want to embed, click the down arrow in the upper right corner of said post, and click "Embed post".
2) You will get HTML/JavaScript code, like the code in example A. Copy it, and paste it where you would like the embedded post to appear.
Example A
<!-- Place this tag in your head or just before your close body tag. -->
<script type="text/javascript" src="https://apis.google.com/js/plusone.js"></script>
<!-- Place this tag where you want the widget to render. -->
<div class="g-post" data-href="https://plus.google.com/116066401701241808979/posts/DLF9DC4KHVe"></div>
For WordPress.com blogs only (the version of WordPress that you don't host on your own server):
1) Find the post you want to embed in Google+ and click the arrow, but instead of clicking "Embed post", choose "Link to post".
2) Copy the URL that you get, and either paste the Google+ URL on its own line like in example 1, or use the official WordPress shortcode in example 2.
Example 1
https://plus.google.com/116066401701241808979/posts/DLF9DC4KHVeExample 2 (replace the existing URL with the URL of a valid Google+ post, and use square brackets instead of curly braces)
{googleplus url=https://plus.google.com/116066401701241808979/posts/DLF9DC4KHVe}Tuesday, August 13, 2013
Windows XP Mode
Do you have Windows 7 Professional, Enterprise, or Ultimate? Do you have programs that are only compatible with Windows XP? If you answered yes, you could download a free copy of Windows XP to run programs that aren't compatible with Windows 7. However, this will only work on Windows 7, and no other versions of Windows. Here's how you can do this.
1) Open the official Microsoft download page for Windows XP Mode, choose your language, and click the green Continue button.
You will be required to verify that you are running Windows 7 Professional/Enterprise/Ultimate, and that your copy of Windows is legitimate. The webpage that indicates so is shown below.
 Open the "GenuineCheck" executable file, and your computer will be checked. If all is successful, you will see the following window:
 You will receive an 8-digit code that you will use to verify Windows. Click "Copy to Clipboard" to copy this code, but do not close this window just yet. Switch back to the browser window, and paste your code into the field where indicated with a green arrow in the below screenshot.
 Once you've pasted the code, click "Validate". If the code's correct, you will see about the same download page you saw when you initially clicked the link, but the download will be unlocked. You may close the window that provided you the code, and click the "Download" button on the web page. This time, when you click "Download", you will be shown the following screen:
 You have 2 options at this point. You may download "WindowsXPMode_N_en-us.exe", but this version of Windows XP Mode does not contain Windows Media Player. If you want Windows XP Mode to include Windows Media Player, choose the first option and click "Next", as indicated in the above screenshot.
When you have chosen your version and clicked "Next", then you will see:
 Once downloaded, open the file and proceed to step 2.
2) When you open the XP Mode installer, it will extract files that are necessary to install.

When this is complete, the installer starts.
 Click "Next", and you will asked where to place the program files.
 It's recommended that you leave the location the way it is, but you may change it if you choose. Just remember the location, as you will need it in the future.
Click "Next" again, and installation will begin.
 You may get a User Account Control window asking if you want to let the program run with administrator privileges. If so, please provide the administrator password or click "Yes".
Once the install completes successfully, you will be shown confirmation of where you installed the files.
 Make note of the location that the installer mentions, and then click "Finish" to finish the installation of Windows XP Mode. Proceed to step 3.
3) Next, we need to download VMlite. Note that you must uninstall all versions of VirtualBox installed on your computer before installing VMLite, or conflicts between VirtualBox and VMLite will occur. VirtualBox will work as well, but under VirtualBox, you can only run XP Mode for 30 days, as you will need to activate it at some point or another. VMlite will automatically take care of this activation procedure. You are going to need an account at the VMlite web site from this point on. If you don't, you may register at their website here. Anyway, once you have registered (or you have a valid login), you can download VMlite here. This is what the download page looks like:
 If you attempt to download the file without logging in, it will not download, and will come to a point where you have no choice but to login. The below screenshot is an example of what you would see if you were logged in, and it also shows that the file has been unlocked and is downloading.

Open the file, and proceed to step 4.
4) When you open the file, the installer starts.
 Click "Next", and you will be asked to comply with the license agreement.
 If you agree, click the appropriate option and click "Next".
 Choose your options (optional), and click "Next" again.
 Click "Next" once more, and the installation will begin.

Do you remember the UAC prompt you may have encountered when installing Windows XP Mode? If you see it again, do the same thing you did before: allow it.
You may get approximately 4 prompts to install device software. This is what one of these prompts looks like:
 You must click "Install" to each of them, or the installation of VMlite will fail.
Once the installation of VMlite succeeds, you will see the following screen:
 Click "Close", and proceed to step 5.
5) The setup wizard to configure Windows XP Mode will start.
 Click the option that says to "Specify the path of the XP mode package or a virtual disk file", and in the text box that follows it, type the following string:
A checkbox will automatically pop-up under the text box with an option to "Make a copy of the virtual disk". Leave this option checked, and click "Next".

You should leave the settings the way they are (but you may tamper with them if you choose), and click "Next" again.

When the virtual disk is being copied, you may see this:
 If you do, close it. When the virtual disk prep is complete, you will see:
 Click "Finish", and proceed to step 6.
6) When you click "Finish", Windows XP Mode will start, and you will have to set up Windows. As Windows XP boots, you may be asked to 'enter your credentials', as shown below:
 Every time you see this (even after you have set up Windows XP, and you're booting it in the future), you must press "Cancel". If you don't, then when you get to the Windows sign-in screen, you will get an error message in Windows XP saying that the user doesn't exist. Anyway, once Windows finishes booting, you will see:
 The computer name is required (type a computer name that you can recognize), but the administrator password fields are optional. Click Next, and setup continues. Once Windows setup is finished, and it (the virtual machine) restarts, you will see the Windows XP desktop shown below.
 At this point, you may wish to install the Guest Additions, but this is up to you. To install the Guest Additions, click the Devices menu at the top of the window, click "Install Guest Additions...", and follow the directions. Otherwise, you're all set.
To launch Windows XP Mode in the future, you can open the Start Menu -> All Programs -> VMLite Workstation -> VMLite XP Mode.
1) Open the official Microsoft download page for Windows XP Mode, choose your language, and click the green Continue button.
You will be required to verify that you are running Windows 7 Professional/Enterprise/Ultimate, and that your copy of Windows is legitimate. The webpage that indicates so is shown below.


When you have chosen your version and clicked "Next", then you will see:

2) When you open the XP Mode installer, it will extract files that are necessary to install.

When this is complete, the installer starts.


Click "Next" again, and installation will begin.

Once the install completes successfully, you will be shown confirmation of where you installed the files.

3) Next, we need to download VMlite. Note that you must uninstall all versions of VirtualBox installed on your computer before installing VMLite, or conflicts between VirtualBox and VMLite will occur. VirtualBox will work as well, but under VirtualBox, you can only run XP Mode for 30 days, as you will need to activate it at some point or another. VMlite will automatically take care of this activation procedure. You are going to need an account at the VMlite web site from this point on. If you don't, you may register at their website here. Anyway, once you have registered (or you have a valid login), you can download VMlite here. This is what the download page looks like:


Open the file, and proceed to step 4.
4) When you open the file, the installer starts.


You may get approximately 4 prompts to install device software. This is what one of these prompts looks like:

Once the installation of VMlite succeeds, you will see the following screen:

5) The setup wizard to configure Windows XP Mode will start.

C:\Program Files\Windows XP Mode\Windows XP Mode base.vhd
A checkbox will automatically pop-up under the text box with an option to "Make a copy of the virtual disk". Leave this option checked, and click "Next".

You should leave the settings the way they are (but you may tamper with them if you choose), and click "Next" again.

When the virtual disk is being copied, you may see this:


6) When you click "Finish", Windows XP Mode will start, and you will have to set up Windows. As Windows XP boots, you may be asked to 'enter your credentials', as shown below:


To launch Windows XP Mode in the future, you can open the Start Menu -> All Programs -> VMLite Workstation -> VMLite XP Mode.
Friday, August 9, 2013
A Review & Tour of Genymotion
Do you remember my first post on how to get AndroVM up and running in VirtualBox? Those .ova files you downloaded were from the AndroVM project. What I didn't mention in my blog post, however, is that the AndroVM project went commercial, and it is now called Genymotion. First, I will tour you through Genymotion, and then I will review this product.
First and foremost, you will need a Genymotion account. You may create one, or login, here. Once you have logged in, you will see the settings page for your account, which will let you change account details, or if you so wish, delete your account. Anyway, you should read the user guide before you download Genymotion. The options you should use are pointed out in this screenshot.
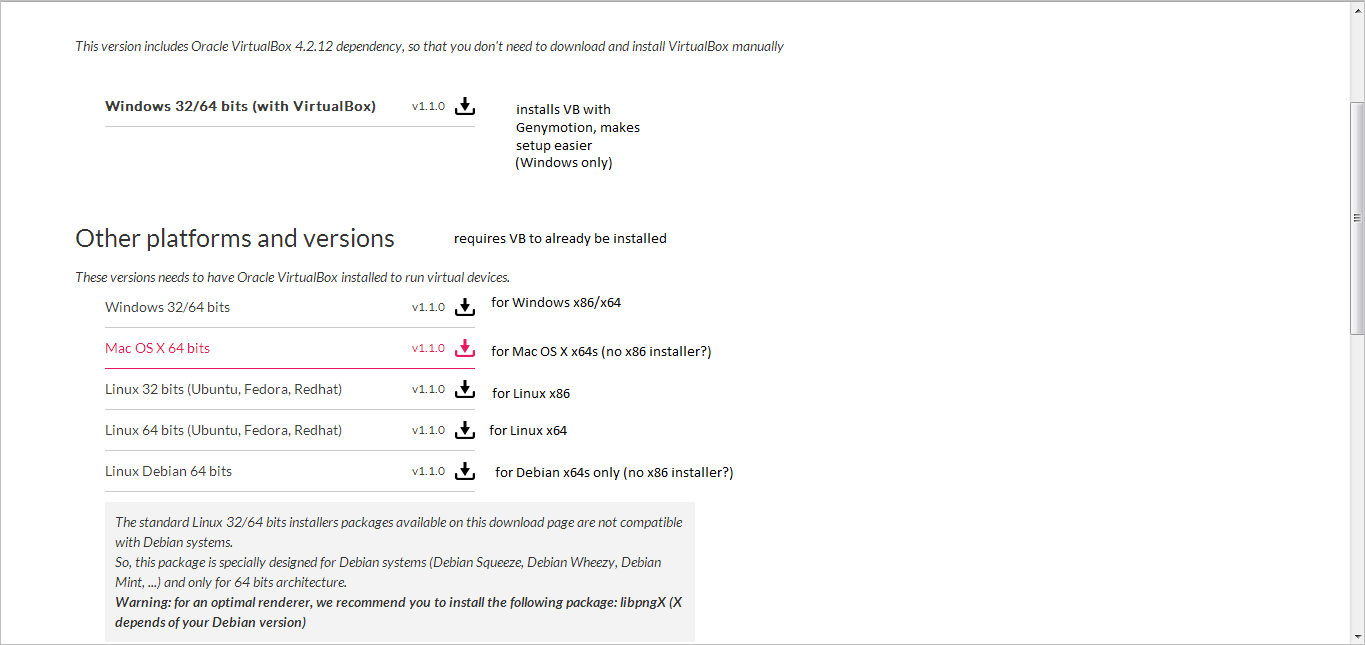
 When you click "Download Genymotion", you will see a number of different options. These options are broken down in the second screenshot:
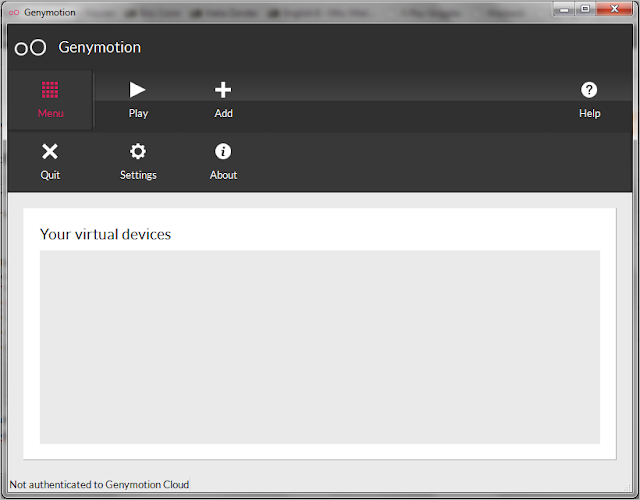
 Click on the file you want to download, and do your stuff with the installer. Once you've installed Genymotion, open it. As it starts up, you will see a splash screen. This is what the main Genymotion program looks like:
 When you click "Add", you will be asked for your credentials to login to Genymotion:
 Enter your Genymotion account login info, and click "Connect" in the login window.
Once you sign in, you will see a list of virtual devices you can download. The field above this, or "Already downloaded virtual devices", shows a list of devices that you have already downloaded, and can re-use without having to repeat the download process. Anyway, you can pick the device you want to emulate in Genymotion, and click the "Add" button. I recommend the virtual devices with Google Apps built-in, but you may choose any device you want. In this case, we will be emulating a Nexus 7 (Android 4.1.1), tablet+phone version, with Google Apps.
When you have chosen your preferred device and clicked "Add", you will see a confirmation window asking you if you want your chosen device:
 Click "Next" if this is what you want, and the download will start:
 Once the download completes, click "Next":
 Name your new creation, and click "Create".
 Click "Finish", and it's back to the main Genymotion screen:
 Need to configure your device? Right-click the device listing, and click "Device settings". If you want to remove it, right-click on it, and click "Delete".
To start your device, double-click on it, or click on your device, and then "Play" at the top of the window.
When you first start your device, you may be asked this question:
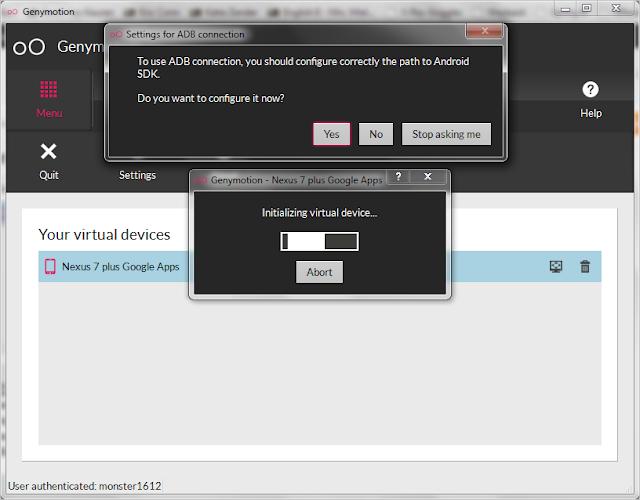 If you have the Android SDK, click Yes. If you don't, click No or "Stop asking me". Here's what the Genymotion Emulator looks like:
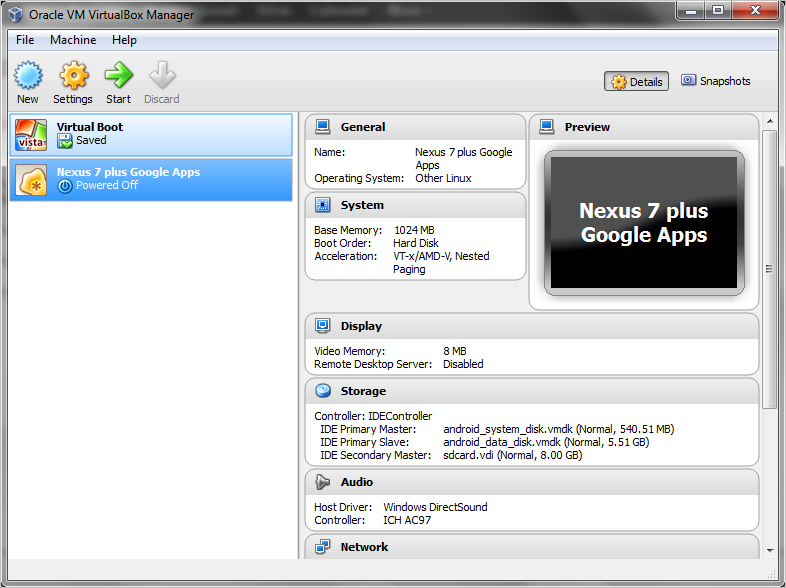
 From this point, you're free to explore Android. See my first post (specifically, steps 5 and beyond) for instructions on setting up Android. Keep in mind, however, that you should always start any Android devices that you downloaded within Genymotion. Just in case you get any ideas to start your device in VirtualBox, here's something you should know. Your device does show up in VirtualBox, but you may not want to start it.
 If you start your Android device in VirtualBox, this is what you see:
 You get the picture.
Review
All in all, this is a great program for emulating Android. It doesn't showcase all the features Android has, and there are a few bugs with Genymotion, but it's still a useful tool for the Android beginner, developer, or anyone who's curious as to what Android has in terms of features.
First and foremost, you will need a Genymotion account. You may create one, or login, here. Once you have logged in, you will see the settings page for your account, which will let you change account details, or if you so wish, delete your account. Anyway, you should read the user guide before you download Genymotion. The options you should use are pointed out in this screenshot.


Once you sign in, you will see a list of virtual devices you can download. The field above this, or "Already downloaded virtual devices", shows a list of devices that you have already downloaded, and can re-use without having to repeat the download process. Anyway, you can pick the device you want to emulate in Genymotion, and click the "Add" button. I recommend the virtual devices with Google Apps built-in, but you may choose any device you want. In this case, we will be emulating a Nexus 7 (Android 4.1.1), tablet+phone version, with Google Apps.
When you have chosen your preferred device and clicked "Add", you will see a confirmation window asking you if you want your chosen device:


To start your device, double-click on it, or click on your device, and then "Play" at the top of the window.
When you first start your device, you may be asked this question:


Review
All in all, this is a great program for emulating Android. It doesn't showcase all the features Android has, and there are a few bugs with Genymotion, but it's still a useful tool for the Android beginner, developer, or anyone who's curious as to what Android has in terms of features.
Thursday, July 18, 2013
textPlus: Great Customer Service!
textPlus is one of the most popular mobile apps for free texting and calling part of the app is also free. To use the calling part, you must receive credits by watching videos of completing offers. If you do not want to watch videos or complete offer, you can always buy credits. App to app calling is 100% free. Just recently, I had an issue logging into my account. I had no idea what the issue was. I couldn't log into my account. I tried resetting my password, but it just didn't work. I contacted textPlus through the live chat section on their website. I chatted with a textPlus Security and Support Manager. She first easily fixed my problem, which I guess was my own fault because it needed a username rather than my email address. After that, I asked her many more questions, and she answered them very enthusiastically. We even made a personal connection. With very few companies, do you receive this level of superior service these days. She also gave me a $10 just because I had an issue and she saw that my credit for textPlus was quite low. I highly recommend them to anyone looking for a free texting / calling service. Its not just the customer service that I like from textPlus, its their product. Its a full featured app that was built without cutting any corners. It works with the majority of mobile devices, including iOS, Android, Kindle Fire, Windows Phone, and Nokia. Everything else is quite regular. You receive a person phone number chosen based on the area that you are in. As I said before, I think the best part of this app is the customer service. textPlus made their customer service spot on, and I think every company should have this level of superior service. I once highly recommend textPlus and it has one the wCross Technologies Customer Service Award. Get textPlus now!
Tuesday, July 2, 2013
Top 5 Chrome Extensions
 |
| (Image by Google) |
Technology's 2 top 5 Chrome Extensions.
1. Jolidrive New Tab Page- The JoliDrive extension redesigns the new tab page within Google Chrome. The JoliDrive service is made by JoliCloud, which has a new approach to internet services. There approach is to combine all online cloud services together, into one fast and easy place. They do a spectacular job achieving this goal. This extension revamps the new tab page, so it shows the JoliDrive interface, and makes it easy to get into your internet services. Get the JoliDrive Chrome extension here.
2. Chrome Remote Desktop- This is the remote desktop app from Google. Although it is built into Google Chrome, it is a full fledged remote desktop program will full features. It offers as quick tech support, or as a long distance log in. CRD is a cross-platform app, so you can control a Mac using Windows, or the other way around. Get CRD here.
3. avast! Online Security- This is the browser-based security extension. We trust Avast for all of our security. This app protects you from many threats, and you can view the rating of the website. The rating of the website is a rating averaged from multiple people. After rating the website, you choose the category of the website (Shopping, News/Blog, Etc...). Get avast! Online Protection here.
4. Gtalklet / Hangouts- These extensions are both IM communication extensions. Gtalklet supports Google Talk (old version), Facebook chat, and other XMPP chat services. Hangouts on the other hand, supports The new version of Google Talk. They are both high quality apps, so choose the one that fits your lifestyle. Get Gtalklet here or the Hangouts extension here.
5. Google+ Notifications- This is the app to see notifications from Google+. Google+ is now the #2 social network (Source: Forbes), and is replacing Facebook. This app with appear with your notifications in a small little notification bell in the corner. It is a simple app, but quite helpful. Get G+ notifications extension here.
10 best Windows OS's (up to 2012)
This is a list of the ten best Windows operating systems (this list extends from MS-DOS to Windows 8). The best systems are labeled first.
1. Windows 7.
Windows 7 is one of the best Windows operating systems to date. It is the last version of Windows to support Windows Aero (the first being Vista, listed below). Windows 7 features a new taskbar that you can pin programs and files to. It also has Windows XP mode, which allows users to run programs designed for older Windows operating systems, although this feature doesn't work for all programs. Like its predecessor (Windows Vista), you will see a search box when you open the Start Menu, allowing you to search for programs and files.
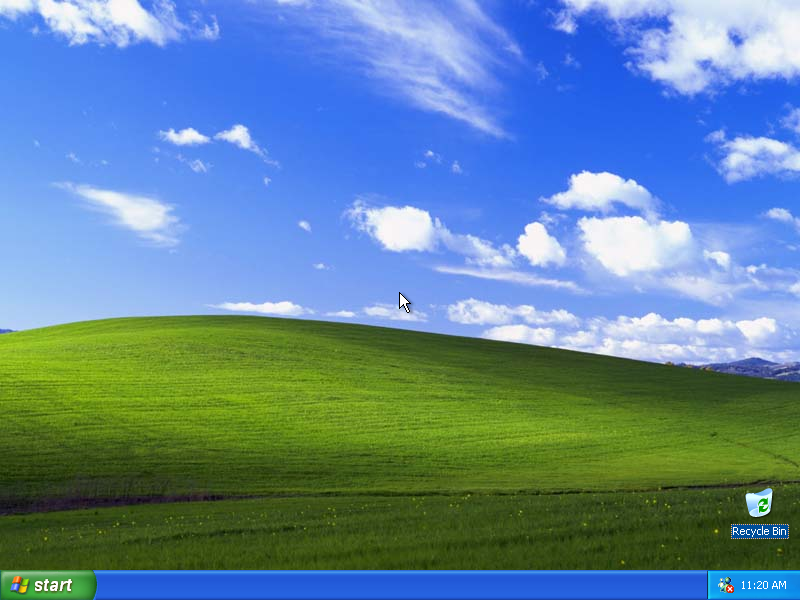
2. Windows XP.
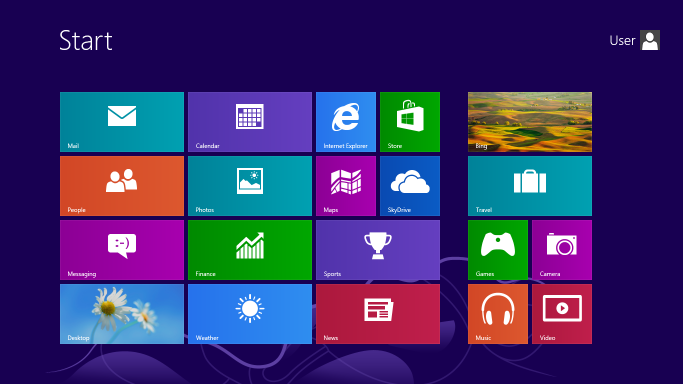
The newest version of Windows (as of the time of writing), Windows 8 features a Start Screen (to replace the Start Menu seen in almost every version of Windows), integrated SkyDrive cloud storage, and allows users to download apps for their Windows 8 devices, in addition to programs that can be typically installed in earlier versions of Windows. There are 2 versions of Windows: the desktop Windows 8, and the tablet-centric Windows Surface, both of which run the exciting (and disappointing) Windows 8. Although it is Microsoft's newest Windows system, many people dislike it.
1. Windows 7.
 |
| from http://en.wikipedia.org/wiki/Windows_7 Used with permission from Microsoft. |
2. Windows XP.
 |
| from http://www.guidebookgallery.org/screenshots/winxppro Used with permission from Microsoft. |
Windows XP may as well be one on the best Windows operating systems released. It featured a re-designed taskbar and Start Menu (an upgrade from Windows 2000), native support for USB 2.0, and driver rollback, which allowed a user to downgrade the version of a driver from a newer version to an older version if the newer driver caused trouble with certain applications. Beware, however, that support for Windows XP will end in 2014. See this article from Microsoft for more information.
3. Windows 8.
 |
| from http://en.wikipedia.org/wiki/Windows_8 Used with permission from Microsoft. |
4. Windows Vista.
You may describe this operating system as a cross between Windows XP and Windows 7. This version is one of the only 2 Windows operating systems to have Windows Aero (the other being Windows 7). This is also the first version of Windows to have User Account Control, which prevents (or at least restricts) what changes users and programs can make to the system.
5. Windows ME.
Windows ME was the last operating system in the Windows 9.x (think Win95, 98, NT) series of operating systems. This operating system was the first to include System Restore, which allowed users to undo system changes, such as program (un)installation. updates, and even some computer virus installations, while keeping user files intact. There was another feature called System File Protection that prevented users from accidentally deleting Windows system files. Support for ME ended in 2006.
6. Windows 3.1.
As the saying goes, this is an oldie but a goodie. This OS featured a Program Manager (an old counterpart to the present-day Task Manager), which allowed you to close unresponding processes. It also contained File Manager (counterpart to.... you guessed it, Windows Explorer), for browsing files. Basically, it wasn't stylish in the way of its gray color scheme, but it was pretty powerful back in its day. Support for this OS ended in 2001.
7. Windows 98.
Windows 98 (and its upgrade, Windows 98SE) was an operating system full of tricks. For example, typing (without quotes) "C:/con/con" would invoke the Blue Screen of Death, a not-so-helpful blue screen showing that Windows crashed, and the user was left with no choice but to press the power button on their CPU/laptop. In general, Windows 98 was not much of a user interface upgrade from Windows 95. Support for this operating system ended in 2006.
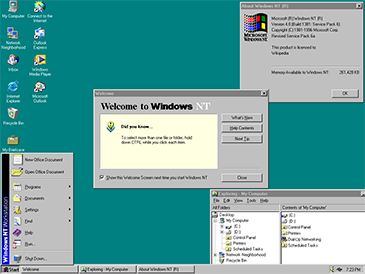
8. Windows NT 4.0.
If you weren't paying enough attention, this could almost pass off as a clone of Windows 98, or even Windows 95. But don't mistake it for either, because they're completely separate operating systems. This specific version of Windows NT featured limited DirectX support (so it couldn't run as many programs as Windows 95 could). Windows NT 4.0 also could not support Plug and Play capabilities. Plug and Play allows a user to plug in almost any peripheral device and avoid the hassle of setup wizards, allowing device usage within minutes. Without this support, hardware drivers would have to be manually installed, inconveniencing users on time constraints. Support for this operating system ended in 2004.
9. Windows 2000.
Windows 2000, also known as Windows NT 5.0, was a Windows OS usable for both general and server computers. It featured the Microsoft Management Console, which allows administrators to perform tasks that can change the characteristics of the Windows OS. It also allowed support for WebDAV (a cloud storage protocol), Active Directory, and NTFS 3.0, which allowed support for disk quotas that limit how much space each user can take up on a storage drive. Support for this OS ended in 2010.
10. MS-DOS.
You should probably know why this is last. If not, it's last because it's a complicated, power-limited operating system in itself. Technically, MS-DOS isn't a Windows OS, but it (and other types of DOS; Microsoft's Disk Operating System was MS-DOS, Apple's was AppleDOS, etc.) was shipped with almost every kind of computer until the age of graphical operating systems (it began around the 1990s), where we saw GUI operating systems such as Windows, Mac OS, and Linux. DOS terminals (or command prompts) were incorporated into the graphical OS's, so tasks that could not be accomplished with the graphical OS could be easily accomplished with DOS. Anyway, DOS systems could organize and manage files on a personal computer, but not too much else. They were complicated because there were all sorts of commands that could be used (and were necessary to execute certain tasks), and had to be memorized. They were power-limiting because you could only do so much with DOS commands, and some DOS tasks were therefore impossible or hard to accomplish. Standalone DOS operating systems were discontinued in 2000. However, as mentioned before, command prompts were incorporated into graphical operating systems, so DOS still lived on, just not as a standalone OS.
That's your top 10 Windows operating systems up to 2012!
 |
| from https://en.wikipedia.org/wiki/Windows_Vista Used with permission from Microsoft. |
5. Windows ME.
 |
| from http://en.wikipedia.org/wiki/Windows_ME Used with permission from Microsoft. |
6. Windows 3.1.
 |
| from http://en.wikipedia.org/wiki/Windows_3.1x Used with permission from Microsoft. |
7. Windows 98.
 |
| from http://en.wikipedia.org/wiki/Windows_98 Used with permission from Microsoft. |
8. Windows NT 4.0.
 |
| from http://en.wikipedia.org/wiki/Windows_NT_4.0 Used with permission from Microsoft. |
If you weren't paying enough attention, this could almost pass off as a clone of Windows 98, or even Windows 95. But don't mistake it for either, because they're completely separate operating systems. This specific version of Windows NT featured limited DirectX support (so it couldn't run as many programs as Windows 95 could). Windows NT 4.0 also could not support Plug and Play capabilities. Plug and Play allows a user to plug in almost any peripheral device and avoid the hassle of setup wizards, allowing device usage within minutes. Without this support, hardware drivers would have to be manually installed, inconveniencing users on time constraints. Support for this operating system ended in 2004.
9. Windows 2000.
 |
| from http://en.wikipedia.org/wiki/Windows_2000 Used with permission from Microsoft. |
10. MS-DOS.
 |
| from http://en.wikipedia.org/wiki/MS-DOS |
That's your top 10 Windows operating systems up to 2012!
Subscribe to:
Posts (Atom)